Wednesday, December 26, 2007

Galootaclaus 2007

I know Santa delivers a lump of coal when you've been bad, and gifts when you've been good, but there's no way I've been 'that' good this year. The package arrived safe and sound over a week ago, and the delivery man was met by SWMBO. Said package was whisked away and all of the cross border shipping documents were removed. I got to look at the box for about 5 seconds. The box was then hidden until Christmas Eve.

So on Christmas Eve, I got to open it once everything had settled down in the house.

The large and very heavy box.

Contents lovingly packed in pine shavings.

An overview of the extremely generous contents.

Close-up of the double ended callipers on the Olive Wood.


Stunned. Speechless. Awestruck. Giddy. Flabbergasted. Overwhelmed. Any one of the items in this box would have put a big smile on my face and fit the bill. Instead I was sent a bounty of goodies that never seemed to stop. I was sent to the kitchen as SWMBO suspected shavings were used as packaging, and she was correct. Once I moved the shavings out of the way, I found:

  • A short personal note from Galootaclaus, including some of the history of the included items.
  • Olive wood (cut in '98, milled into boards in '99, and drying in the shop rafters since)
  • A Tape of St Roy episodes (something I've never had an opportunity so see as it's not carried on PBS in my area)
  • A gorgeous little double ended calliper about 3.25" long, and opens to 1.75" (no maker's mark I can locate)
  • 5 books:
  • The Art of Making Elegant Jewelry Boxes (Design & Techniques) by Tony Lydgate
  • The Best of Wood Boxes (Ideas & Plans for 59 Unique Wood Boxes) Edited by R. Adam Blake
  • Box Making Basics (Design, Technique, Projects) by David M Freedman
  • Marvelous Wooden Boxes You Can Make by Jeff Greef
  • Award-Winning Boxes (Design & Technique) by Tony Lydgate

I don't quite know what to say, or how to say it, so I'll keep it simple. Thank You Michael. From the bottom of my heart.

That Olive looks gorgeous, and I'll be saving it until I can find a fitting project. I can't begin to tell you how enjoyable you made my Christmas.

Sunday, August 12, 2007

A Level Of Difficulty....

Why do we sometimes choose to make things so difficult? I would like to think that sometimes that is the correct way. The necessary way. In fact, the only way. Here is a case in point.

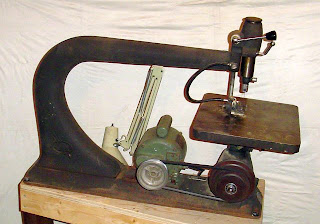
I recently purchased a scroll saw. A Beaver JS-3100 24" scroll jig saw. Not a new tool by any stretch - I believe it was manufactured in the 40's, by The Callendar Foundry & MFG. Co. LTD. in Guelph, Canada. A monster. A massive chunk of cast iron. A marvel of engineering. The best made scroll saw at the time. Of pre-Beaver/Rockwell, Rockwell/Delta, Delta lineage. A saw that takes 5 -7 " pinless jeweller's blades, or can take sanding sticks, files and saber blades? And, let's face it, it can handle thicker material than my bandsaw.


The problem? Mine came without a stand. So... A little research was in order. After digging through several forums, and spending some time online going through different types of stands and designs that were available, I put together a small checklist of what seemed to be the most important considerations:
  1. Will you be standing or sitting when you scroll?
  2. Three leg stands seem to be more inherently stable than a four leg design. This seems to be because it is easier to stabilize 3 points on an uneven floor.
  3. It must be stable, and solid.
  4. It is easier to view your work and guidelines as you cut if you raise the back of your scroll saw by about three inches.
  5. Convenient storage for blades, parts, accessories should be considered, but isn't really a deal breaker.
So here is what I went with: Sitting, 3 legged stand, raised at the back. Built out of construction grade lumber I had on hand (2x and 1/2" plywood). I opted not to worry too much about blade storage - I put them in a coffee can that stays under the saw.

The plans were pretty much out of my head (original "full" detailed sketches below). The dimensions were based on the following:
  • Height of table must be at elbow height while sitting (27" for me) so subtract the base to table height on the scrollsaw and thickness of the plywood gave me 14.5" for the stand, 17.5" at the back. This turned out to be a 4 deg. rise.
  • The width needed to be a minimum 8" at the back (the width of the scrollsaw) and wider at the front for stability - it also seemed like a good size for foot clearance with the legs angled out, and the plywood I had kicking around was 18" wide. Turned out this was an 8* angle.
  • The length needed to be at least the length of the saw's base - 34"
  • The legs needed to be angled out for stability - 10* splay seemed about right.
Wait.... that's 3 angles. Haven't cut compound angles - in fact, I have a project that has languished because I have a 2 way compound angle that I've had trouble wrapping my head around. I could still back out and make it square with 4 legs..... No - what would be the point of doing it "easy" when you can just as well do it "right".

The Original "Plans"

In the end I drew out the start and stop points for all 3 directions on the back leg, and stared at it a while, joined up the lines that should create the right angles, and cut the practise piece. Since that actually worked, I then did the real one, remembering to change the angle directions for the left/right sides :)

The Main 3 way compound angle. I opted to
cut the shoulder to help support the weight of the top/saw.
I also used shoulders on the front legs which you can
sort of see in the "top" view below.

Using The Table Saw as an Assembly Table.
(It was the flattest surface I had and a convenient height.)


Shot From The Top. I Used a Brace between the
two front legs and from the front to the back to
prevent any issues with the legs spreading
- especially when the stand is moved.


With the top attached - I added some
dowels and holes to keep the allen key
and wrench I need close at hand.


Now with the stand complete, I wanted to rewire it, as the original wiring was bad - the plug head actually fell off when I picked it up at one point. I wanted to add a switch for the scroll saw, but to have a live plug in for a light, auxiliary dust blower, etc. Dug through books on wiring, and headed down to my local Home Hardware to pick up some 14 AWG 3/C water resistant (flexible copper, rubber sheathed) wiring - not available at any of the big box stores in my area.


Wiring the switch and outlet. A good lesson:
be careful that you wire the hot, and not the neutral.
I had to go back to the electrical wiring book
when I plugged in the saw and it ran no matter
what the switch was set to. Guess I should have
referred to the book while working
rather than trust my memory.


But you have to give me credit for testing the outlet.

The saw and stand, in all it's glory.

Close up of the head with the tension
system, blower, and guides.


Close up of the guides and hold-down.

The saw in use, I believe a medium to fine
coping saw blade with the pins cut off was
used for the oven squirrel.

Final verdict?
  • Is this high enough? I still lean forward sometimes - but it's been pretty good for the work I've done so far. If it become an issue, I can always add some 2x risers under the legs.
  • Stable - yes. The legs haven't been a problem when moving it.
  • Easy to move? No - but it's a really heavy saw. I mean just look at the thing. It gets dragged out for use, and dragged out the way when I'm finished. No issues with the legs at all.
And I learned to deal with a compound angle. Now maybe I can get around to finishing that other project.....

Monday, July 30, 2007

you learn something new every day....

today's lesson: A bead looks intentional - a subtle cove need to be part of an overall design. A subtle cove on an otherwise straight section doesn't look like a cove - it looks like an accident.

The other day I turned a pen - an El Grande Fountain Pen (Berea Hardwoods kit, from Lee Valley). I have turned my previous pens with a pretty straight barrel - or an extremely subtle 'swell' in the centre. I thought I'd play a little with the latest one, so I left a slightly larger swell at the 1/3 way mark near the bottom of the cap, and added a slight cove. It looked good at that point, but I think the sanding flattened the swell and didn't much affect the cove - changing the proportions.

I wasn't sure about it.

I was torn between leaving it (it was hard not to play with it - pleasing to the fingers) and "fixing" it (visually it looked like I screwed up.) I was able to disassemble the cap of the pen, and remount it. So I fixed it.

I'm happy I did now. There was enough material I was able to change it from a gentle swell with a subtle cove to dead ass straight. I left the gentle swell on the barrel, as it feels comfortable when using, and is subtle enough it doesn't look out of place with the straight cap.

*Photos will be coming as soon as I can get my digital camera back.

Saturday, July 21, 2007

Coarse No. 2....

My first pen, an Extra-Large Twist (Cigar),
pen kit from Lee Valley (Berea Hardwoods).


The blank was a Rust & Black Acrylic Acetate,
from Lee Valley (not sure who their supplier is).


The second course I took from Lee Valley was a Pen Turning course. Always wanted to try, but didn't have everything required. I also didn't want to purchase everything required (bits, mandrels, bushings, etc.) only to find out that I now owned $100 of products I wasn't going to use again.

I called to sign up for the pen turning course, only to find out that the wooden pen turning course had been cancelled. The instructor had retired, and the person putting the course offering together had accidentally listed it.

They were able to sign me up for the Acrylic Pen Turning course that they had running. I chatted with someone knowledgeable from the staff to find out what the difference was - and he felt their was little difference. The plastic was probably tougher to work - more prone to damage, melting, more work to polish and put a gloss finish on.

I have yet to complete a wooden pen so I can't really comment. I have however completed 5 acrylic pens, and 2 from a bowling ball thermosetting material (which is really nasty to polish). My only experience with turning wooden pens was to test cut some blanks I had mis-drilled. I have 4 wooden blanks ready to turn - out of figured wood. So even when I do finish my first wooden pen, I'm not sure my experience will be 'typical'.

The best part? The association/union I'm a member of at work is allotted funds for staff to take courses that are professional or personal development. I received a full refund :)

Ok.... the best part was I got to spend a dedicated evening turning. The free pen was a nice bonus.

Wednesday, July 11, 2007

kaleidoscope....

With the job the way it's been, I've been having trouble getting to the shop. There are so many other things to do. But I keep an eye out on the Lee Valley seminars - they often have courses of interest (made my first spokeshave in one.) Not only are the courses interesting, an opportunity to meet like minded folk, develop new skills with assistance, have good instructors, and include all required tools and supplies - they provide a dedicated amount of shop time. A "MUST" be in the shop scenario. I recently managed to fit in two :) This was the first one.

This one was of interest to me. I'd never made a kaleidoscope before, but had recently run across a couple of interesting websites when I was looking into some finger spinning tops on-line. The Brewster Society was one I would up on during some link surfing.


Lo and behold, a couple days later, Lee Valley provided the opportunity to make one without having to invest in extra equipment on a venture that may prove disappointing, disastrous, or a dead end after the one project.

It was fun. I was one of three in the class with any turning experience (with the exception of a fantastic instructor) and the only one that owned lathes. Consequently, I was the one that got to "try" everything first during the demonstration part and was used as an example. Remind me to stay quiet and in the background next time.


Anyone interested in more of the technical detail on this project, let me know. This particular project was developed by Lee Valley specifically and fine tuned over a couple of years. There are a couple of things I would consider changing for the next one I do.

A moving object cell would be the first amongst the list - as most people that pick it up to play with try to turn the cell instead of the entire scope.


It was a lot of fun, and a bit of a confidence builder - there are a number of fairly critical tenons and such used to glue these together. Although I took a Mike Darlow based turning course at my local lumber supply specialist, it has been a while since I had done any major projects.

The wood is Claro Walnut, with Maple end caps. Most of the class turned their end caps plain, I opted to add the coves and a couple of decorative grooves. I managed to luck out and obtain a piece of Walnut with some nice grain - a combination of luck, and looking for some knarly figure.

And some samples of the patterns from the finished kaleidoscope.


This object chamber uses a glycerin solution as the liquid - this allows the objects to float or fall, providing a view that slowly changes. It is often like watching the blooming of a flower.


I apologize for the lack of quality on the photos of the viewing chamber - I was literally holding the lens of my little digital camera up to the viewing hole and trying to keep it centred while holding the object chamber over a bright light source. Not great, but it provides a general idea.


Tuesday, July 3, 2007

first scrolling project....


A Mother's Day gift. Design was based off a graphic I had seen on a car year's previously and roughly sketched on a napkin. Frame is made from Ash. The background is crushed red velvet. The work is done in 1/8" Baltic Birch plywood that was stained with MinWax Ebony stain after scrolling.

Standard learning curve (vertical) and planning ahead (mounted into the frame half an hour before delivery) which was proceeded by months of sort-of-planning and unplanned procrastination.

----
(Pattern available upon request for personal/non-commercial use.)

Monday, July 2, 2007

happiness is.....

sometimes as simple as the arrival of my new "GALOOT" key fob.

Thursday, May 31, 2007

remiss....

Life has been funny of late. Some health issues have slowed me down, and things have been busy at work and at home.

Recently though, I received a call from an instructor I had taken a set of furniture building courses from. He's taught for a continuing education program for 10 years andrecently decided to cease the cont-ed teaching in order to pursue other interests - namely his own woodworking. So, he's selling off some of his tools - the secondary set he's collected that he would bring for student use at his courses. Was i interested in attending the garage sale?

OK.... So i didn't pick up a thousand dollar item for five bucks. But the prices were extremely reasonable - averaging about 1/5 to 1/3 the price new. And he had upgraded some of the items -Hock irons in the spokeshaves and some of the planes (no photo), all the planes have been fettled, and set-up, irons so sharp i had bled for 5 minutes before i realized when i handled something with a little less care than i should have.

I acquired some items that have been on the "nice to have" list, but never get purchased because of the cost. It's amazing though, how fast those $5 or $10 items add up. Spent more than i should have, but picked up some nice items.

Record T5 Technical Jack Plane


Anant A10 Carriage maker's rabbet plane. (I know, it's
like buying a smart car when you want aJaguar.)


assorted goodies (not including a Record 151R
spokeshave with Hock iron, and 2 sets of assorted
carving tools.)


And that's where the pretty stuff stops. I also picked up a Stanley Plough Plane. It's so ugly, Stanley wouldn't even put a number on it. I believe it was the last combination plane Stanly made, coming out of their English factory. The irons appear to be styled after the later No 45 irons with the small single slot. I didn't really need it, but couldn't quite help myself from picking it up either.

Stanley combination plane. No number designation
but I believe the unofficial designation is "fugly".


It did come with a full set of irons, flattened & sharp
enough to cut you looking at them. Notice the lovely
original holder.


Now I just have to find some time to make something. Like perhaps a wooden handle to replace the plastic one on that lovely combination plane ;)

Thursday, April 5, 2007

happy early fathers day....

When you're better half says she wants to buy you a new lathe, and gives you a price range that has a large number fall within it.... who's to say no? especially when she tells you she wants you to have it right away so you can use it as much as possible :)

I have an older Beaver/Rockwell lathe, that I've been using - but the lack of a morse taper in the headstock has become extremely annoying. That and it sits in an unheated garage, and I live in a country that is winter for 8 months of the year. (Am I serious? Sort of. As I look outside at our April weather, I note it is snowing hard winter snow, and we're up to 6 inches again this week.) I can now work in the basement with heat. And I'm portable.

Thankfully I know someone who did a lot of testing when they bought their mini/midi/maxi/mega lathe a couple of years ago - and with the exception of a couple new variable speed models they haven't changed much. They went with a General. The King Canada lathe I bought is produced in the same factory, and has the identical CSA number (pretty much proving it to be the identical machine.) The difference? The colour of the paint, and $150.00. (It wasn't available back when he bought his.)

A new adapter, and my OneWay Talon chuck is up and running.

Now if only I could find some time to turn.

Wednesday, March 14, 2007

Amused

I've been off work this week, due to a health issue. The unfortunate part is that it prevents me from doing any woodworking, or it would be a good week.

So I've been spending the time doing some work and updating my web areas. Something I never seem to have time for these day.

You can imagine my amusement when I read my horrorscope today:

Aquarius: The idea of a website takes hold and you are spending long hours designing and preparing the site in order to get it on the web as soon as possible. Your idea is a sound one.

Mystery.... Steel Soled Wooden Razee Jointers

I recently had the pleasure during a day off, of being able to head down to a small town in the area that has an "antique walk" - a collection of small antique stores scattered throughout its streets. Like the usual antique "mauls", condition and pricing don't seem to have much to do with each other. But amongst the overpriced, completely rusted metal planes, and wooden planes with blown cheeks and cracked soles I discovered a couple of gems.

For the same price that most wanted for their junktiques, I found a pair of wooden jointers (a 20" and a 24") in beautiful condition. Razor sharp irons


I couldn't pass them up. They came home with me. Price tag: $60 each.

However, the planes themselves, have no makers mark. No users mark. They are a mystery to me that I would like to find additional information on. From the type of wood, to the possible maker. Construction of the two planes is almost identical. The only difference I've been able to find is on the back of the wedge - the relief hole for the chip breaker screw is not identical. I am not sure if this identifies it as a user made plane, or if it is a user modification.

The only identifying marks I have been able to find are:
  • Both Chip Breakers: + Robt Sorby Sheffield
  • One iron: Auburn Tool Co., Thistle Brand, Auburn N.Y.
  • One iron: Spear & Jackson, Warranted, Cast Steel


Additional photos:


If anyone can provide any information on these planes, it would be greatly appreciated.