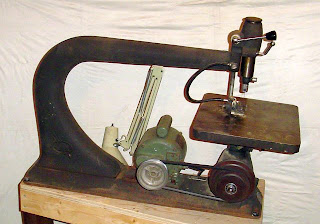
I recently purchased a scroll saw. A Beaver JS-3100 24" scroll jig saw. Not a new tool by any stretch - I believe it was manufactured in the 40's, by The Callendar Foundry & MFG. Co. LTD. in Guelph, Canada. A monster. A massive chunk of cast iron. A marvel of engineering. The best made scroll saw at the time. Of pre-Beaver/Rockwell, Rockwell/Delta, Delta lineage. A saw that takes 5 -7 " pinless jeweller's blades, or can take sanding sticks, files and saber blades? And, let's face it, it can handle thicker material than my bandsaw.


The problem? Mine came without a stand. So... A little research was in order. After digging through several forums, and spending some time online going through different types of stands and designs that were available, I put together a small checklist of what seemed to be the most important considerations:
- Will you be standing or sitting when you scroll?
- Three leg stands seem to be more inherently stable than a four leg design. This seems to be because it is easier to stabilize 3 points on an uneven floor.
- It must be stable, and solid.
- It is easier to view your work and guidelines as you cut if you raise the back of your scroll saw by about three inches.
- Convenient storage for blades, parts, accessories should be considered, but isn't really a deal breaker.
The plans were pretty much out of my head (original "full" detailed sketches below). The dimensions were based on the following:
- Height of table must be at elbow height while sitting (27" for me) so subtract the base to table height on the scrollsaw and thickness of the plywood gave me 14.5" for the stand, 17.5" at the back. This turned out to be a 4 deg. rise.
- The width needed to be a minimum 8" at the back (the width of the scrollsaw) and wider at the front for stability - it also seemed like a good size for foot clearance with the legs angled out, and the plywood I had kicking around was 18" wide. Turned out this was an 8* angle.
- The length needed to be at least the length of the saw's base - 34"
- The legs needed to be angled out for stability - 10* splay seemed about right.
 The Original "Plans"
 The Main 3 way compound angle. I opted to
cut the shoulder to help support the weight of the top/saw.
I also used shoulders on the front legs which you can
sort of see in the "top" view below.
 Using The Table Saw as an Assembly Table.
 (It was the flattest surface I had and a convenient height.)
 Shot From The Top. I Used a Brace between the
two front legs and from the front to the back to
prevent any issues with the legs spreading
- especially when the stand is moved.
 With the top attached - I added some
dowels and holes to keep the allen key
and wrench I need close at hand.
Now with the stand complete, I wanted to rewire it, as the original wiring was bad - the plug head actually fell off when I picked it up at one point. I wanted to add a switch for the scroll saw, but to have a live plug in for a light, auxiliary dust blower, etc. Dug through books on wiring, and headed down to my local Home Hardware to pick up some 14 AWG 3/C water resistant (flexible copper, rubber sheathed) wiring - not available at any of the big box stores in my area.
 Wiring the switch and outlet. A good lesson:
be careful that you wire the hot, and not the neutral.
I had to go back to the electrical wiring book
when I plugged in the saw and it ran no matter
what the switch was set to. Guess I should have
referred to the book while working
rather than trust my memory.
 The saw in use, I believe a medium to fine
coping saw blade with the pins cut off was
used for the oven squirrel.
- Is this high enough? I still lean forward sometimes - but it's been pretty good for the work I've done so far. If it become an issue, I can always add some 2x risers under the legs.
- Stable - yes. The legs haven't been a problem when moving it.
- Easy to move? No - but it's a really heavy saw. I mean just look at the thing. It gets dragged out for use, and dragged out the way when I'm finished. No issues with the legs at all.


